Wednesday, July 4, 2012

finally, by some miracle...

It's been a while since the last post (in which I whined about the non-progress of the pool) but GUESS WHAT???  It's finished!  I have some lovely before and after pics to share-


So classy!  So grown-up!
We (well, the fence people) also put up that white fence you see outside the pool screen.  It's like our own mini-resort now and I just love it!  We hosted around 15 friends for a pool party last week and it ended up raining all day because Tropical Storm Debby decided to blow through.  I suppose it turned into a hurricane party of sorts, but we still got in that pool, rain and everything!  Overall, All Seasons Pools did a great job on  the remodel, even if it did take freakin' forever (about 2 and a half months).  I'm just happy to finally be able to park it on the swing with some new, overstuffed pillows and just enjoy it all.   
 
(Gratuitous cat-lady pic...sure, I chose the color palate to match my animal)

Friday, May 18, 2012

the waiting pool

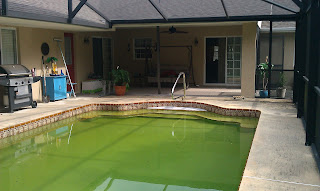
I mentioned a couple posts ago that Scot turned 31 in April and we went to Key Largo.  Well, on that 31st birthday, he bought himself a new swimming pool.  Well, sort of.  We'd been talking about renovating the pool and back deck for a while, and we finally settled on All Seasons Pools to do the job.  We (meaning, I) picked out the new waterline tile, new pavers for the deck, and the new interior pebble finish.  Scot dropped the first check off on April 4th, and 2 weeks later, the pool was drained and the new tile was up.  15 business days, they said.  It'll be done.  One month later, and here we sit with a big empty hole in the ground with some nice tile on it!
Now, I know they're busy and all but the thing I miss the most is actually using the back porch.  We had to remove the swing and all the chairs and store them (after applying fresh coats of spray paint, of course!) so the only thing out there is the cat and the garden hose.  I loved sitting on the swing on a cool evening after the thunderstorms passed through.  Now I'm kinda stuck inside.  I could utilize the new bench on the front porch I guess, but I'm in my ratty pajama pants now and a proper southern lady just doesn't sit on her front porch in her pajamas.
Anyway, back to the pool crisis...the new pavers FINALLY showed up on Tuesday but...BUT the coping (the part that actually goes around the pool, like an outline) was the wrong style.  Not like, ugly-wrong style, but cover-up-half-the-tile-we-had-put-in-wrong style.  Turns out the manufacturer of the pavers does not even MAKE the style we ordered for our renovation, so they just changed the order and sent us something else and did not confirm with the pool company.
So now, we have an empty hole in the ground in the back yard and 10 pallets of stone pavers sitting in the front yard.  Klassy.
The paver crisis has yet to be resolved.  It's looking like an additional 3 weeks of waiting if we have to order all new stones to get the proper look.  What I'm most upset about is that, silly me, I thought that if we gave All Seasons a check the first week of April that we'd have a renovated pool by the end of May.  I was planning to have a Memorial Day BBQ/pool party like we did last year but the 1/2 inch of water sitting in the deep end from the rain that just passed isn't going to fly as a fun time.
Although, the cat has gotten pretty used to jumping in, wandering around, and jumping out of the empty pool.  God I hope I'm home when she tries that after it's finished and filled up.  If only for the laugh.
Here's a look at the lovely view from the kitchen at the moment.  I'm kinda getting tired of looking at it.

Wednesday, May 9, 2012

the latest addition

As we were discussing plans last week for our next "Monday of Projects," Scot decided that he'd tackle a simple one like, oh, painting the garage.  I figured I'd pretend to help a little on that one, but my focus sat on The Cabinet.  The Cabinet has been sitting in the garage for maybe 2 months now-I saw it in a garage sale down the street while on a run so, after I did my laps around the block, I swung by as the guy was closing up shop and offered him $5 for it.  The Cabinet was a hell of a lot heavier than I thought it would be (turns out it was real wood) but I managed to lug it 4 houses down to home.  I bought it mainly because of how freaking UGLY is was, thinking surely I could give it a new life.

Anyway, Scot bought some cabinets to replace the teetering, sagging shelving in the garage and built and installed them by about noon on Monday.  I did help a little, especially when he got to the painting part.  The garage looks so fresh and clean-I'm actually impressed we got so much done in one day.  I mean, we spent 3 months renovating each bathroom and now we've completed 2 big projects in 2 weekends!  Big accomplishment for sure!

As for The Cabinet, it got its makeover from me between the shifts I was helping out in the garage.  I wiped it down and cleaned it up and actually used paint stripper and a real electric sander to clean off and smooth out the top.  The whole project took me about 8 hours to complete but here's what I did:

-Sanded down the rough patches and dirt that just wouldn't come off-this thing had 2 coats of paint on it from before
-Doors removed, spray-painted main cabinet Heritage Red, 3 coats.
-Sprayed a light coat of the Hammered Dark Brown spray paint we bought for the back porch swing (that was a whole 'nother project!) on the screen fronts of the cabinet doors
-Used olive paint from the can we used on the house exterior to paint the doors and the inside of the cabinet.
- Used Minwax to stain the top of The Cabinet, wiped it down 20 minutes later, and sprayed it with a clear gloss coat
-Mixed up glaze I used from the Cheery Cherry Chairies and glazed the cabinet and doors.
-Replaced knobs and hinges.
Price Breakdown: Cabinet... $5
                            Heritage Red paint... $4
                            Hammered Dark Brown paint...already owned
                            Gingko Tree Exterior Latex...already owned
                            Minwax...already owned
                            Glaze and paint mix...already owned
                            Knobs and hinges...$10
TOTAL: $19 for a beautiful piece of furniture!
 BEFORE
AFTER!
OH!  And a detail on the purple vase there- it was an old frosted while light globe cover from the hallway light!  I spray painted it a glossy purple and I think it looks awesome.

Wednesday, April 25, 2012

key lime dream

Scot turned 31 earlier this month (I know, I'm next, shut up) so I surprised him with a weekend down in Key Largo.  I used my Trip Advisor app on my Kindle to plan the whole thing, from where to stay to where to eat and what to do.  He still insisted on driving-there were doubts as to whether or not my car would make the trip and back alive- so I just plugged the hotel into the GPS and we were off.  6.5 hours later, after an unintentional scenic route through Miami (stupid construction!) we made it.

The first evening of our stay, I'd booked us a sunset sailing trip on a pirate ship.  Turns out, no one else had booked that evening so we got a private cruise for ourselves!  We got to help hoist the sails and steer the boat and maneuver all the sails and lines around-it was so cool!  It was interesting to get back in to "learning mode" because learning to sail a boat is what I think about when I get a little burnt out on flight instructing-when I think about how my students know just as much about flying as I do about boating, it reminds me to take care in my instruction and explain everything simply and clearly.

As the sun set, we got to blow the conch shell (pronounced KONK).  Traditionally, you blow it to signify the end of the day and to drive away any bad spirits, similar to the way you'd blow a trumpet.  It sounds a lot like a boat horn, low and loud.  Youtube it sometime, it's pretty cool.

The next day, we set out for some snorkeling.  At the same dock our boat left from, the actual boat used in the move "The African Queen" was being kept and refurbished.  I had to grab some pictures, because I adore that movie, starring Katherine Hepburn and Humphrey Bogart.  The African Queen herself looked amazing- I remembered that pesky boiler that Charlie Allnutt fought with the whole way through the movie, the tiller that Rose handled to steer them through the rapids and falls, and the newly replaced canopy, no longer tattered but a pretty red stripe.  I was in heaven!

Snorkeling was fun, of course.  The water was a chilly 77 degrees but we managed to hit 3 sites along America's only coral barrier reef.  We were 10 miles off shore and saw tons of amazing tropical fish and beautiful corals.  We also saw what's known as the "Christ of the Abyss"-a Jesus statue about 20 feet underwater, intentionally sunk for your diving pleasure.  So cool!  We got seriously sunburned on the hour-long ride back to shore because we, uh, kinda forgot about the need to reapply sunscreen after swimming in the ocean.  My legs are burnt so bad I can't even bend them to put socks on.  It's pathetic.

Upon arriving back at the hotel, all I wanted was a shower to get all the saltwater off.  Not happening, since the water pressure was gone!  Apparently the hotel was working on the pipes so we just went down to the pool to trade seawater for chlorine.  By the time we got back, water pressure was back up and we were able to get ready for dinner.

After a delicious meal followed by the best key lime pie EVER at Mrs. Mac's, we headed to a bar called the Pilot House, which has a glass floor.  You can totally see the water below and even feed the fish through a hole in the floor!  I had a key lime martini which was basically pie in a glass.  Freakin' awesome ya'll.
Sad to say we had to leave the next morning but we managed to purchase some key lime chocolate and a baby key lime tree on our way out of town.  I officially have a new favorite vacation spot, though.  And soon I'll have the homemade pie to take me back...at least for a brain-cation when I need it!  Enjoy some pics :)
 The African Queen!
 Sunset sailing
 The sign reads "Watch for falling coconuts"
 Feeding the fish at the Pilot House.  They eat oatmeal
 Snorkel friends
   Chillin' with Jesus

Friday, April 13, 2012

no gnomes allowed

It's garden time again!  Early last month I picked up some new veggie sprouts and seeds to give agriculture another go.  Last year I had a hell of a time battling with squash bugs (yes, that's what they're called) and diseased tomatoes after a good first batch.  Let's hope I learned something because this year we've got the following:
Squash
Zucchini
Tomatoes
Green beans
Corn
Bell peppers- green, red, and orange
Herbs

So far everything looks okay, I even picked my first squash off the plant this evening.  Nothing around to cook for dinner so it looks like I'll be having a squash.  And another glass of Keel and Curly Winery's Tangerine Tango Zinfandel.  If you're here in Florida, go get a bottle from Publix.  I'm usually not a red wine drinker (Lakeridge's Sunblush is as dark as I'll go) but this stuff is awesome!  It's like juice, only better.

Back on track now...

About the squash bugs- I've sprayed enough chemicals on those plants to kill every bug on the block, let's hope it works. 

Oh!  I also dug up my strawberry plants from last year and moved them to a box inside the screen.  Turns out the only reason I wasn't getting any berries at all was that the birds were getting to them first.  Admittedly, I only really get about 1 or 2 a week but they're a nice suprise and, after a quick shot with the garden hose, I eat them right off the plant.  We also planted a pineapple in a large pot.  Whether or not this is going to work is TBD because we bought one, ate it, and planted the top part that we cut off.  No Google research on this or anything but we're hoping in 2 or 3 years we get a result.

The herbs are in good form, as usual.  My rosemary plant is turning into Audrey II and that stupid mint I planted last year and then dug up because it started spreading and taking over the whole right side, has found its way back from the dead and started sprouting in the herb box.  Note: If you want to plant mint because you're like, "hey mojitos are awesome and now I can make them whenever I want!" STAY AWAY.  Or plant it in a pot where it can't get out.  I've been trying to track down some sage because I think it's sophisticated and plus I saw a really good looking pork recipe on the cooking channel that I want to try and I need sage.  Haven't had any luck finding plants though.

Anyway, here's a look!


Other than this, we've been crazy busy painting the house and relandscaping.  That'll be my next post, so until then... :)

Wednesday, February 22, 2012

cheery cherry chair-ies

We had Lowe’s come in yesterday and put new carpet in ya’ll.  After living with the old stuff that had been there since 1995 (it was dated on the bottom when we pulled it up!) I tell you what, the feeling of walking on new, clean, stain-and-weird-stray-hair-free carpet is almost indescribable.  We’ve adopted a no-shoes-on-the-carpet policy that we both keep forgetting about but are trying hard to stick to.  Next step is outfitting the entire house with new window blinds.  All the windows are kind of oddly-sized so we’re getting blinds custom-fit.  They’ll be those 2 inch plantation-style blinds that will lend a really nice updated feel to the place.

On to more DIY though!
The 2 chairs that Scot had sitting at the kitchen counter were a $5 yard sale find from an infinite number of years ago.  They were this icky yellow/tan color-poorly done with paint streaks along the bottom.  After my chandelier project, I was dying to paint those chairs red and use a chocolate glaze on them to give them an antique-y feel.  I bought a can of Rustoleum Satin finish in Heritage Red and a bottle of clear mixing glaze, found the can of primer I used on Chandy was still in the shed, and got to work.

Note: if you decide to take on a project similar to this, just know that it takes 3 cans of Heritage Red spray paint, not just 1.  And it takes 2 cans of primer.  I could move a lot faster through these projects if I only got all my crap together first.

Each chair got a coat of primer first.  I didn’t bother trying to sand them down, just sprayed on the primer and let it dry for an hour or so.  I was already thinking the chairs looked pretty darned good in flat white, just because the yellow-tan was so hideous.

After that, I used up a can and a half of red spray paint for each chair.  I was out in the shed (I guess it’s my new workshop!) bending and twisting all around trying to get every millimeter of chair covered.  It took probably 3 coats, and when I pulled the chair out into the sunlight I found even more bare spots.  I decided to let it sit overnight and dry before glazing.  Later that evening, I noticed in front of the bathroom mirror that the red spray paint had tinted my blonde hair a cheerful, pink hue!  Scot heard me shriek and came in to see what was up.  After studying my new look for another minute, I decided that I look totally…punk.  3 rounds of wash/rinse/repeat took care of that problem.

The next day I found some MORE bare spots on the chairs and spritzed with more red paint.  Glad I let it sit overnight.  I moved the chairs out of the shed and onto some newspaper on the pool deck (newspaper!  See, I’m learning!)  Mixed the glaze according to the directions on the bottle, brushed it on with a paintbrush, let it sit for a few, and wiped it off.  Glaze, sit, wipe.  Glaze, sit, wipe.  The more you do it, the darker it gets.  The longer it sits, the darker it gets, but it also gets stickier and is harder to wipe off smoothly.  I seriously had NO clue what I was doing during this process, but I crossed my fingers, let it all dry and I think it came out beautifully, don’t you think?
Chairs: Free (already owned)
3 cans Spray Paint: $15
1 can Primer: (already owned 1) $3
Glaze: $17 (yikes!)
Brown Paint Sample for Tinting Glaze: $4
TOTAL: $39 for 2 new chairs (So-so. I'm still annoyed at the cost of the glaze but I didn't even use half of it so at least if I need it I won't have to buy it again)


Wednesday, February 15, 2012

a painted chandelier

The DIY network strikes again!  Ever since we finished the floors (Okay I’m lying- ever since I first SAW it), the old, yellow lighting fixture just off the entryway hasn’t looked quite right and I’ve been dying to replace it.  Come on, seriously, tell me I'm lying.

I scrolled through the offerings from Lowes, Home Depot, and a couple local lighting stores with out much luck- everything I kinda sorta liked was a minimum of 200 bucks.  And I still didn’t see anything that just, you know, spoke to me.

I was poking around the Habitat for Humanity ReStore place down on
Colonial Drive
looking for a large oval mirror on a stand that I could fix up when I saw IT- a shoddy, unassuming, downright fugly little glass and brass chandelier sitting on a bottom shelf.  No price tag, wires hanging out; I wasn’t even sure it worked.  I paid $9 for it and took “Chandy” home with me, where it sat in the garage for 2 weeks.


The interwebs are an amazing resource for DIY projects.  So here you go- my tutorial on painting your own brass chandelier:

TAKE MORE THAN ONE “BEFORE” PICTURE!!!  Not just so you can brag to your friends over your amazing finished project, but so you can remember how to put the damn thing back together!

(I would know.)

(Shut up.)

Okay, so I got this thing into pieces and Scot and his brilliance hung it up with string in the shed so I could get it painted.  I taped up over all the exposed wires and put Scotch tape over the tops where you’d screw the light bulbs in.  I’d taken the white plastic “candle” part off (they just slid off real easy) so I just put blue tape around the wires underneath.  I used Rustoleum primer, shown below.  Check the nozzle before you buy it so you don’t buy an effed up can and have to take it back for a new one.  Again, trust me.


Chandy’s little screw-on, decorative parts were too small to hang so I stuffed them with newspaper, balanced them on wooden skewers, and stuck them in the yard.  Lay out more newspaper so you don’t unintentionally spray paint your grass white.  Ooops.


Do probably 2 or 3 coats, waiting 20-30 minutes in between.  Let the primer dry for like, 2 days.  Seriously.  Especially if you’re in a high-humidity area, like Florida.  I got busy with work and poor Chandy hung out in the shed for almost a week before I got back to her.  The paint I used for the final coat was Rustoleum Hammered Finish in Dark Brown.  I didn’t take a picture of it because that paint it a pain in the ass.  I went to spray the chandelier and as soon as I squeezed the trigger, paint shot out sideways and coated my left arm and then started dripping out of the can and coated my right hand.  After a few choice vocabulary words, I kept spraying.  The paint kept shooting out and running down my right arm now.  I had to keep spraying though because as it dried it sort of glued my whole hand to the can of paint.  When I could no longer move my fingers and Chandy was pretty well covered, I peeled off a layer of skin with that stupid can and used up half a bottle of nail polish remover trying to remove the spray paint from my body.  An hour later, I went back out to try to get a second coat on her, wrapping my hand in a Wal-Mart sack as protective gear.  It doesn’t work all that well, I’d suggest elbow-length dish gloves from the get-go if you want to try this nonsense.

After 2 coats of spray paint dried (on my skin!), I went back out to the shed just before sunset and sprayed a clear gloss enamel on the chandelier.  And then I painted my fingernails pink to cover up the brown spray paint.

The chain holding up the chandelier was downright gross and I surely didn’t want to try to paint the wires and the individual rings so I sewed a sleeve for it.  I just got a half yard of dollar fabric (way too much!), cut out a long rectangle and sewed up the sides inside out.  I flipped it back to slide down over the chain and scrunch into place.


Chandy hung in the shed for another week til I could get back to her.  I swung by Hobby Lobby with a 40% off coupon burning a hole in my pocket the next Saturday.  I couldn’t decide what else to add to my project- little crystals or rope trim?  Shades?  It looked like it needed something, I just couldn’t figure out what.  Lo and behold, I found the last 5 PERFECT mini lamp shades at the “Lobby” and the truly magical part was that they were 50% off!  Deep red shades with some fun trim would be the perfect accent to a lighting fixture that I wasn’t even sure even worked!

After putting it together and taking it apart 3 times before I figured out where all the pieces went (remember, pictures!), I put in new bulbs, popped the shades on, put on my wire cover, Scot fastened Chandy up into the ceiling.  One drumroll, a flick of the light switch and TA DA!!!!!  I felt like Clark Griswold at Christmas!  Beautiful, magical light!  What a glorious display!  There may have been a happy dance involved.  Anyway, I love it and I’m excited to share it with you!
Total cost for this NEW chandelier:
Chandy- $9
Primer- $3.50
Hammered Finish paint- $7
Clear enamel gloss- $2
Fabric- $0.50
5 mini lamp shades-$15
TOTAL- $37 for the WIN!!!